
It is very important to add instructions in your Analysis files in order to explain to others how they should use it. This can be done in a variety of ways. The most direct way is to add Text Areas that contain the necessary information. The downside of this approach is it takes up a lot of real estate in the analysis file. Another viable approach would be to add a button which will launch the instructions in a popup dialog. We will first show you how to do this in TIBCO Spotfire Professional, and then in a future post we will show you how to do this so it works in TIBCO Spotfire Web Player.
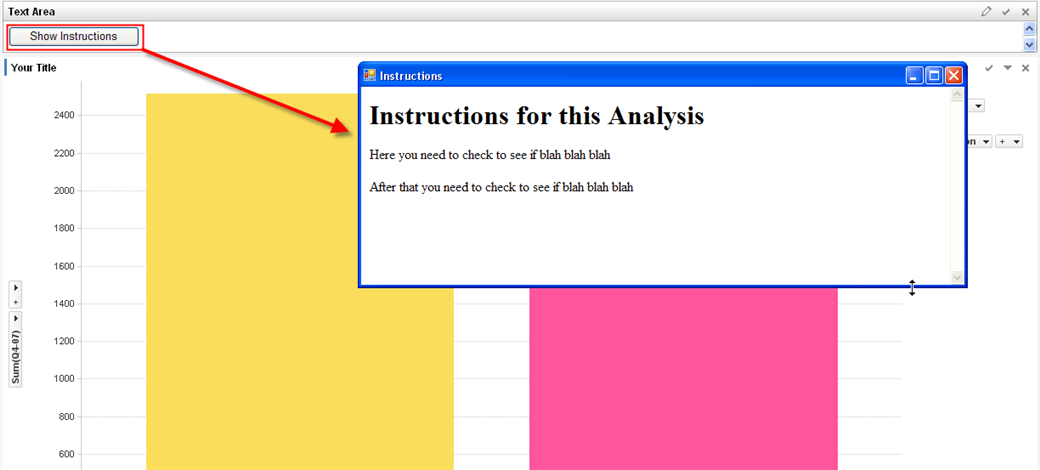
Once we are done, you will have a small Text Area with just one button. When the user clicks on that button, a window will open above Spotfire with the instructions. This can be developed to be one instruction set for the entire analysis or one for each page. See the image below for what the final version could look like.
To start with, we need to figure out where the instructions will be stored. Given this is meant for people only using Spotfire Professional and not the Spotfire Web Player (we will discuss how to do this for a Web Player file in an upcoming post), we need to be consider a user may be working offline and not connected to the internet or the Spotfire server. If this is not a concern, you can code the instructions in an HTML page and post them on a web server.
Then we need to launch a .NET windows.form which contains a Web Browser. The following code will launch a Web Browser in a windows.form control and display www.server.com/instructions.html inside it.
import clr
clr.AddReference("System.Windows.Forms")
from System.Windows.Forms import Form, DockStyle, WebBrowser
f = Form()
f.Text = 'Instructions'
f.Width = 800
f.Height = 600
wb = WebBrowser()
wb.Navigate("http://www.myserver.com/instructions.html")
# Layout
wb.Dock = DockStyle.Fill
f.Controls.Add(wb)
# Display the Control
f.ShowDialog()
Let's assume you cannot simply point to a file on a web server and you would like to keep the intstructions directly inside the Analysis File. The best way to do this would be to write the instructions to a string, which is then stored in a temporary file, and referenced in the WebBrowser control.
import clr
clr.AddReference("System.Windows.Forms")
from System.IO import Path, File
from System.Text import StringBuilder
from System.Windows.Forms import Form, DockStyle, WebBrowser
sb = StringBuilder()
sb.Append("<h1>Instructions for this Analysis</h1>")
sb.Append("<p>Here you need to check to see if blah blah blah</p>")
sb.Append("<p>After that you need to check to see if blah blah blah</p>")
tempfilename = Path.GetTempFileName()
newHTMLFile = Path.ChangeExtension(tempfilename, ".html")
tempfile = open(newHTMLFile, 'w+b')
tempfile.write(sb.ToString())
tempfile.close()
f = Form()
f.Text = 'Instructions'
f.Width = 800
f.Height = 600
wb = WebBrowser()
wb.Navigate(newHTMLFile)
# Layout
wb.Dock = DockStyle.Fill
f.Controls.Add(wb)
# Display the Control
f.ShowDialog()
File.Delete(newHTMLFile)
File.Delete(tempfilename)
A third option would be to list the instructions in a Document Property rather than as a string inside the Script. To do this, you can create a Document Property and then store the instructions in that. The value of the property is limited, but there is more characters allowed in the Description, so you can use that field to enter the instructions.
Then in your script, instead of building a string to pass in the instructions to the Web Browser, we can reference the description of this property and pass that in. Assuming our property is called page1Instructions, we can use the following code to reference the Description of that property.
strInstructions = Document.Data.Properties.GetProperty(DataPropertyClass.Document, "page1Instructions").Description
The complete script for this third option is shown below:
import clr
clr.AddReference("System.Windows.Forms")
from System.IO import Path, File
from System.Windows.Forms import Form, DockStyle, WebBrowser
from Spotfire.Dxp.Data import DataPropertyClass
strInstructions = Document.Data.Properties.GetProperty(DataPropertyClass.Document, "page1Instructions").Description
tempfilename = Path.GetTempFileName()
newHTMLFile = Path.ChangeExtension(tempfilename, ".html")
tempfile = open(newHTMLFile, 'w+b')
tempfile.write(strInstructions)
tempfile.close()
f = Form()
f.Text = 'Instructions'
f.Width = 800
f.Height = 600
wb = WebBrowser()
wb.Navigate(newHTMLFile)
# Layout
wb.Dock = DockStyle.Fill
f.Controls.Add(wb)
# Display the Control
f.ShowDialog()
#Must delete the temp files so they do not persist on the users' computer
File.Delete(newHTMLFile)
File.Delete(tempfilename)
Yet another solution would be to add a description into each Visualization using its Properties dialog. Then have the Script loop through all Visualization's on the page and append its Title and Description using the StringBuilder.
Remember, this solution only works in Spotfire Professional and Spotfire Enterprise Player, it will not work in Spotfire Web Player since it's a .NET windows control we are displaying. We will show you in an upcoming post how to create similar instructional dialogs for your files that you will share over the Web Player. To learn more about Script Controls, consider taking SP232: Automation APIs using IronPython